Chemical Peel - The Ultimate Guide
Learn all about the chemical peel – what types there are, how they’re done, healing and aftercare, average cost, and much more!
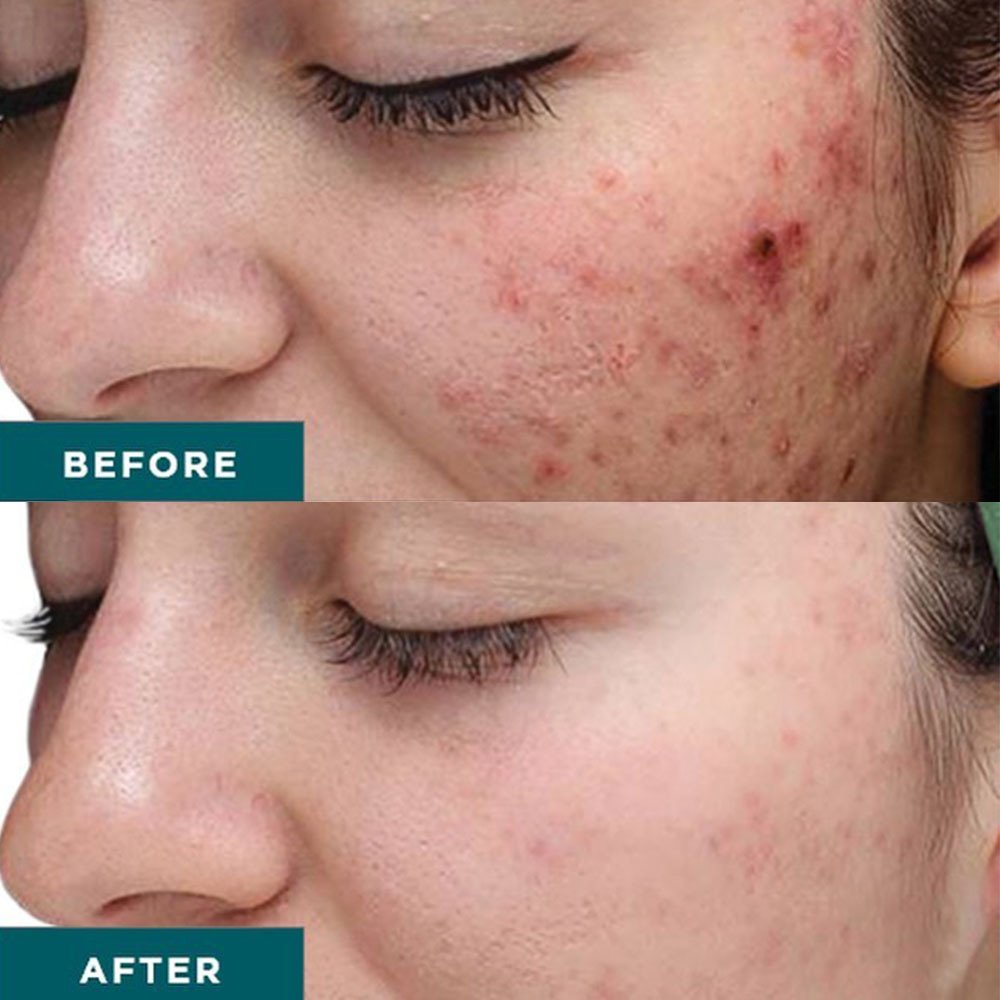
Image source : PMUhub
Explore more chemical peel topics:
- Overview
- Cost
- Aftercare
- Recovery
- Gone Wrong
- For Acne Scars
- For Hyperpigmentation
- For Wrinkles
- For Dry Skin
- On Body
- AHA vs BHA
- BHA Peel
- Salicylic Acid Peel
- AHA Peels
- Glycolic Acid Peel
- Lactic Acid Peel
- Azelaic Acid Peel
- Mandelic Acid Peel
- Kojic Acid Peel
- Pyruvic Acid Peel
- TCA Peel
- Jessner Peel
- Phenol Peel
Skin imperfections can be diminished or eliminated in many ways, but one procedure that’s established itself as the go-to is a chemical peel. Effective, versatile and totally customizable for the needs of each client, the chemical peel can be considered a fail-proof facial.
But it’s also somewhat controversial. To answer all your questions about chemical peels, we’ve prepared a comprehensive guide through the treatment. Read away!
What Is a Chemical Peel?
The chemical peel is a cosmetic treatment that improves the appearance, texture, and overall integrity of the skin through chemical exfoliation. It’s a non-laser skin resurfacing procedure which removes the outermost layer of the skin to improve its general state, or to diminish or eliminate the following conditions:
What Does a Chemical Peel Do?
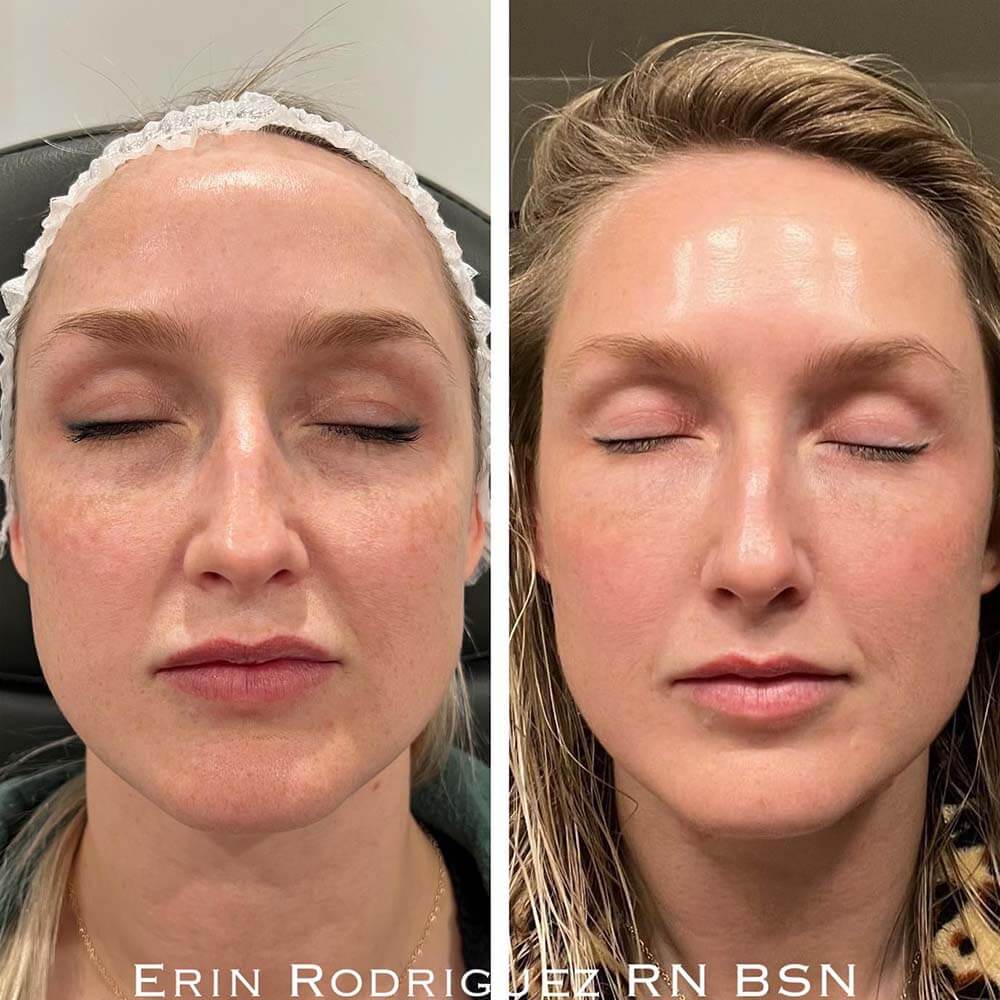
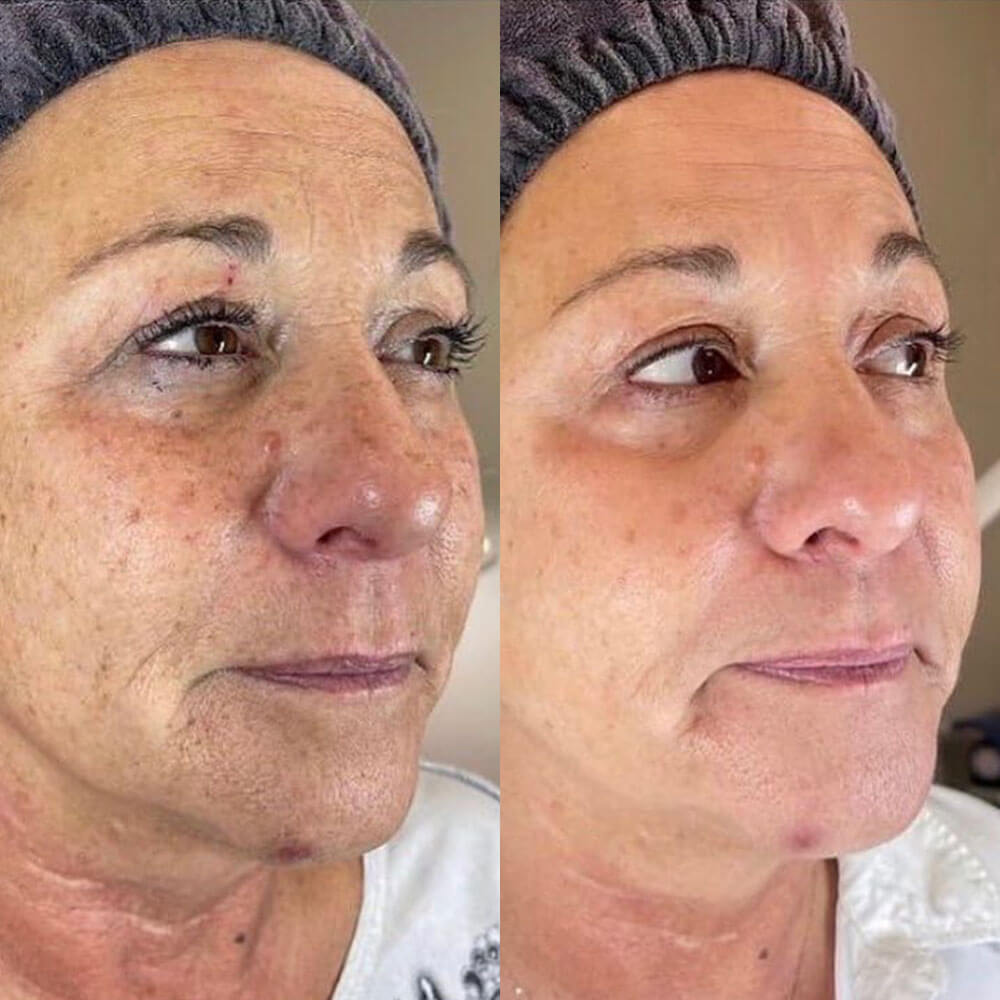
- Fine lines and wrinkles
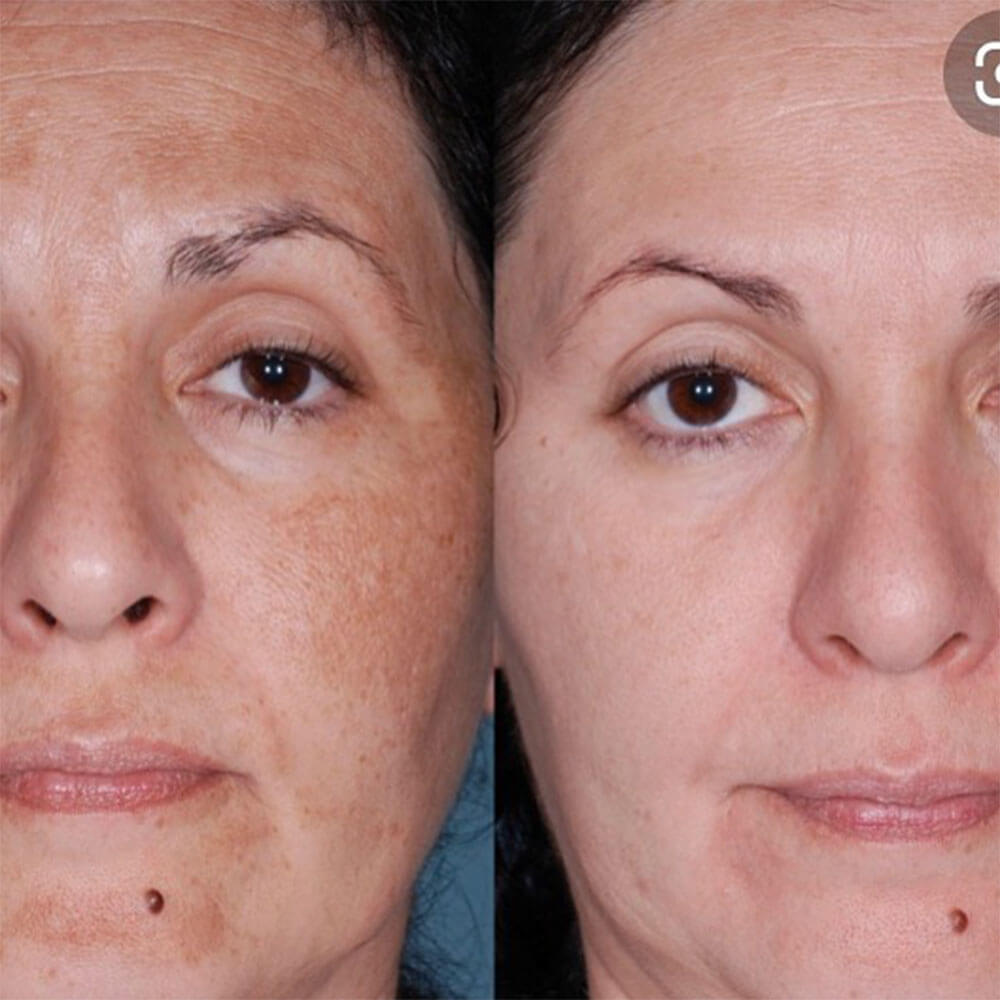
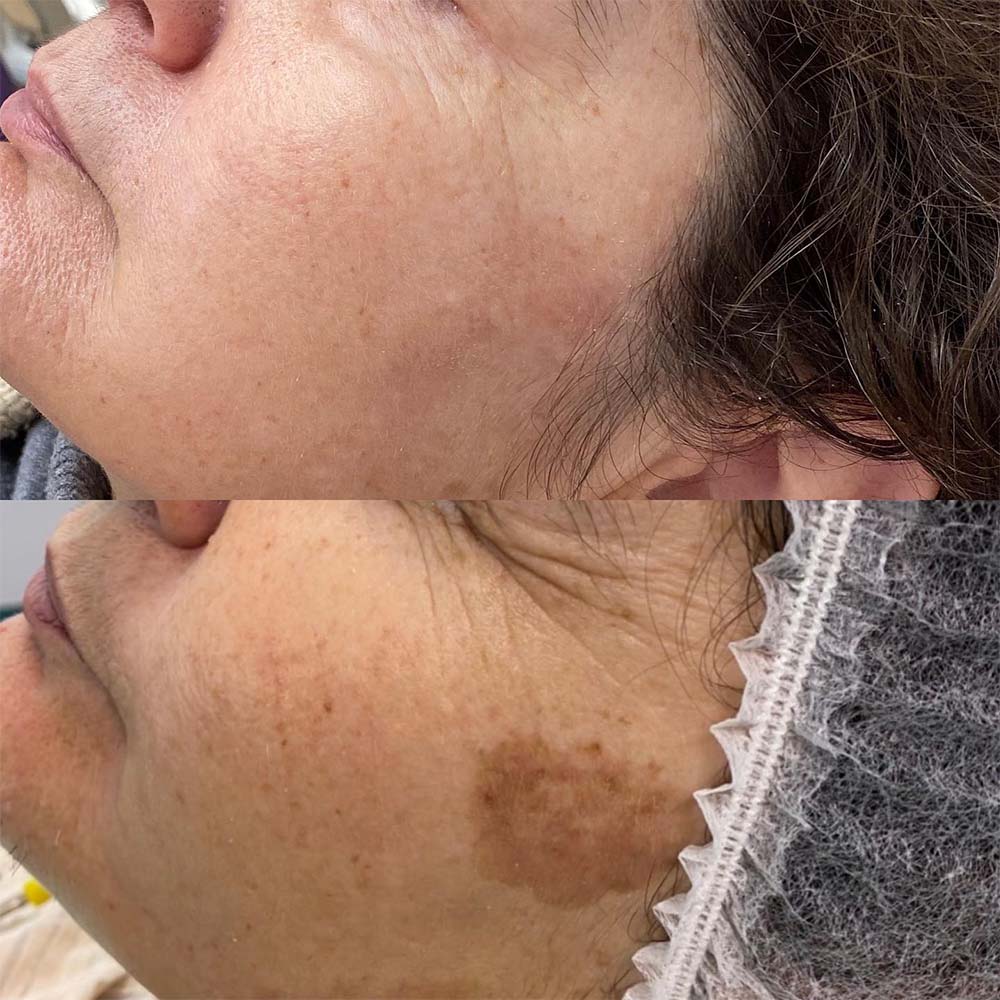
- Discoloration (age spots, sun damage, melasma, freckles…)
- Certain types of acne
- Mild scarring (acne scars)
- Large pores
- Tough skin
Depending on the severity of the condition, the intensity of a chemical peel varies. The treatment is always fully customized, adjusted to the individual needs of the client’s skin.
What Does a Chemical Peel Do?
A chemical peel causes intentional damage to the surface of the skin, destroying the outermost layer of skin cells, causing them to peel off, and finally revealing new, better skin with the condition targeted diminished.
The damage is caused by applying chemical agents – acids – which react with different proteins in the skin, causing the destruction of cells. The acids can target a layer of skin of varying thickness, depending on how deeply rooted the skin condition is.
Based on this, chemical peels can be categorized as light, medium depth, and deep.
The agents penetrate the skin, and within 2-3 days, the affected skin starts peeling off. The peeling process lasts a few days, and this stage of the process is what makes people reluctant to get the treatment.
We won’t lie, the process isn’t the most attractive, but it only lasts a few days, and it’s worth muscling through.
Types of Chemical Peels
Chemical peels are divided into 3 categories according to intensity: light (AHAs, BHAs), medium depth (TCA and other), and deep (Phenol). The intensity of the peel depends on the severity of the condition clients want treated.
Let’s look into each category:
Light Chemical Peel
Light chemical peels only affect the epidermis. It will primarily give the skin a healthy glow, make it feel smooth, help with acne, but it can also diminish signs of aging and discoloration to a point. Great results can be achieved with repeated treatments, though.
The lightest option only removes the stratum corneum, the outermost layer of the epidermis made up of dead keratinocytes, highly keratinized dead skin cells. A somewhat more intense version affects the deeper layers of the epidermis.
In either case, the layer of the skin that’s peeled off is thin, the flaking is relatively light, there’s little downtime (fun fact: light chemical peels are nicknamed lunchtime peels because of this), and it can be repeated relatively frequently (every 2-5 weeks).
Chemical agents commonly used:
- AHAs (alpha-hydroxy acids) – glycolic acid, lactic acid, malic acid
- BHAs (beta hydroxy acids) – salicylic acid
These acids are custom combined and diluted to achieve a light peel.
Medium Chemical Peel
A more intense option. A medium chemical peel affects the epidermis and the upper layer of the dermis. A medium depth peel is effective at treating deeper wrinkles, acne scars and discoloration.
With medium depth peels, the peeling is more intense, and so are the side effects. However, the results are also more dramatic.
Chemical agents commonly used:
- TCA – trichloroacetic acid
- Jessner’s solution – a combination of salicylic acid, resorcinol, lactic acid and ethanol
- Glycolic acid (higher concentration)
Deep Chemical Peel
The most intense version which penetrates even deeper, into the lower dermal layer. This is a serious treatment that is only opted for in the case of deep wrinkles, sun-damaged skin, blotchy skin, but also as a treatment for precancerous growth.
For this reason, it entails a local anesthetic and a sedative, to ease the discomfort, as well as up to 8 weeks of preparations – using a retinoic acid cream which thins out the skin and ensures the chemicals penetrate it evenly.
A deep chemical peel causes extreme skin peeling and demands a rigorous post-care regime to prevent permanent skin damage. The side effects can last up to 14 days. However, it promises very long-lasting results – up to 10 years.
Chemical agent commonly used:
- Phenol, also known as carbolic acid
- Some of the acids already mentioned, but in high concentrations
What Parts of the Body Can Be Treated?
While chemical peels are most often done on the face, it’s also possible to treat the skin elsewhere on the body. Some areas of the body often treated are:
- The neck
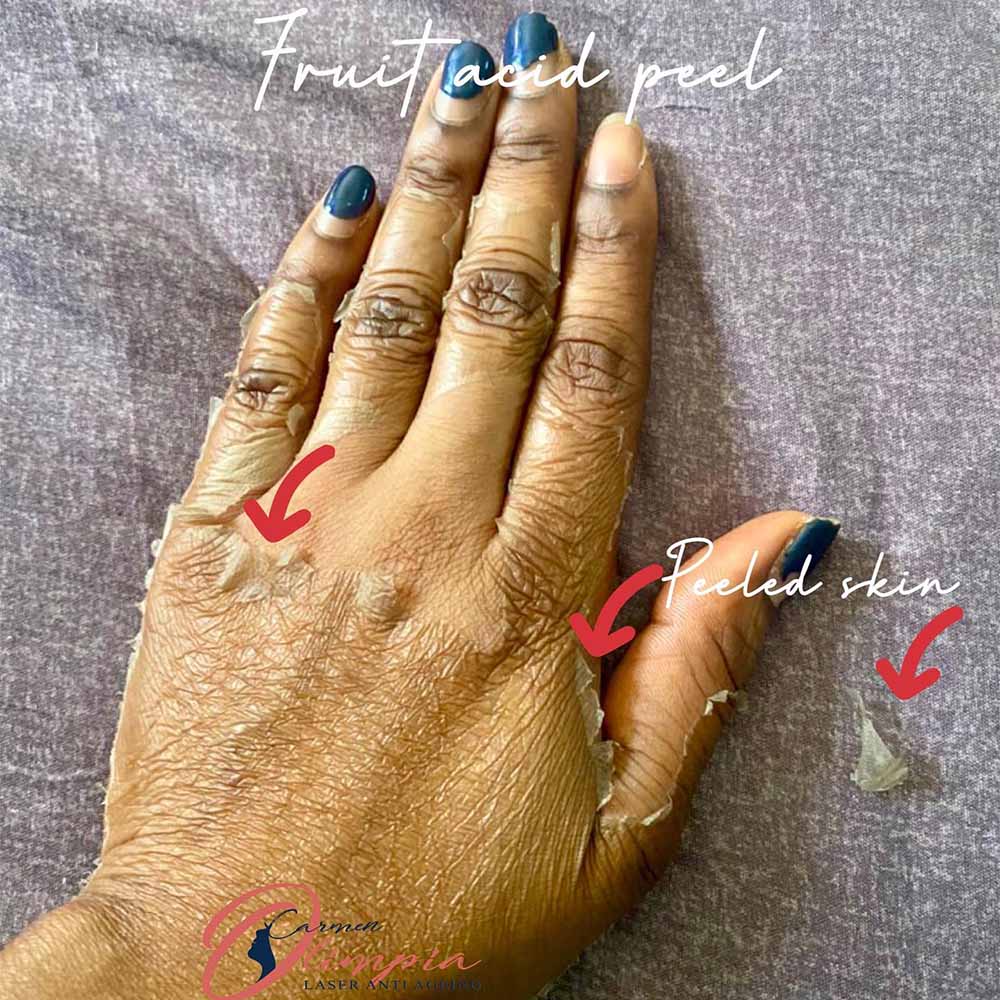
- The hands
- The back
The feet can also be softened with a chemical peel, getting rid of dry, rough and cracked skin, but this is usually done as an at-home treatment, with exfoliating socks.
Chemical Peel Process Step by Step
Let’s break down the process of doing a chemical peel:
Before the Treatment
A chemical peel is not something that should be taken lightly. The decision of whether you need a chemical peel and which particular one is suitable for you should be left to your (cosmetic) dermatologist.
So that would be the starting point – seeing your dermatologist, discussing your skin concerns with them, letting them assess the situation, and having them decide on the best course of action.
If they decide on a deep peel, they will prescribe the pre-care regime that will prepare the skin for the treatment.
Step 1 – Cleaning and Degreasing
When you show up to your appointment, the first step is cleaning the skin. It needs to be cleaned of all makeup or product residues and dirt.
Most chemical peels require the skin to be 100% free of oils, so the cleaning may include a degreasing step – the skin may be cleaned with acetone.
Step 2 – Protecting the Eyes and Nose
If the area treated is the face, a layer of protective cream is applied around the eyes and the nostrils, to stop the acids from spreading into these areas and getting into the eyes/nose.
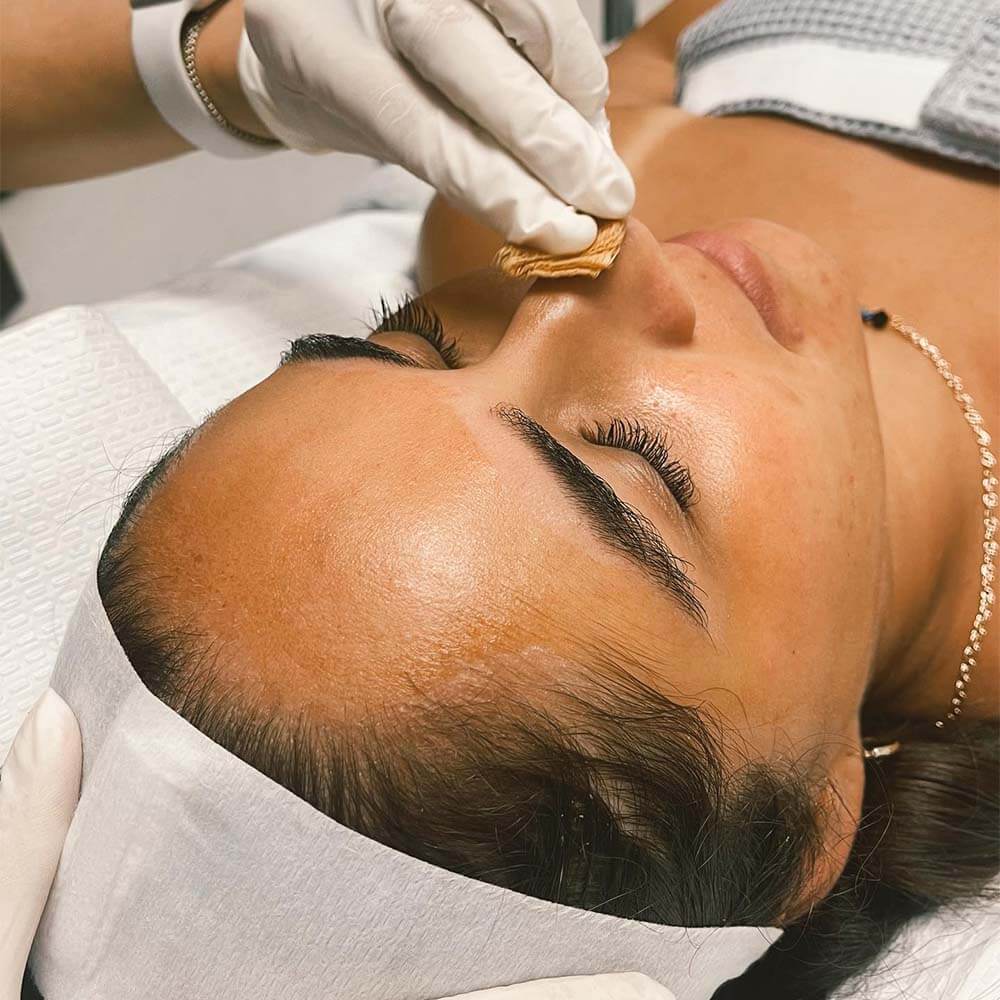
Step 3 – Applying the Peeling Agent
The dermatologist will prepare the acids.
Using a brush or a pad applicator, they will spread the solution across the face. Depending on the type and concentration of the peel, they may go over the face once, or multiple times.
The acid is left on the face. How long depends on the type of peel, but 15-20 minutes is a general timeframe.
During this time, the skin will react and the client can expect a range of sensations:
- Tingling that crescendos into stinging, in some cases even painful prickling (but the most extreme portion only lasts a couple of minutes)
- Heat
- Burning
The deeper the peel, the more intense the discomfort will get. To ease the process, it’s a common practice to have the client hold a small fan they can use to blow air where they feel the most discomfort.
If you’re getting a chemical peel for the first time, these sensations can be quite intense. But with each further session, your skin will get desensitized, so to say.
Step 4 – Cleaning and Neutralization
Finally, the acids are removed, but to stop their action, a special neutralizing solution is applied.
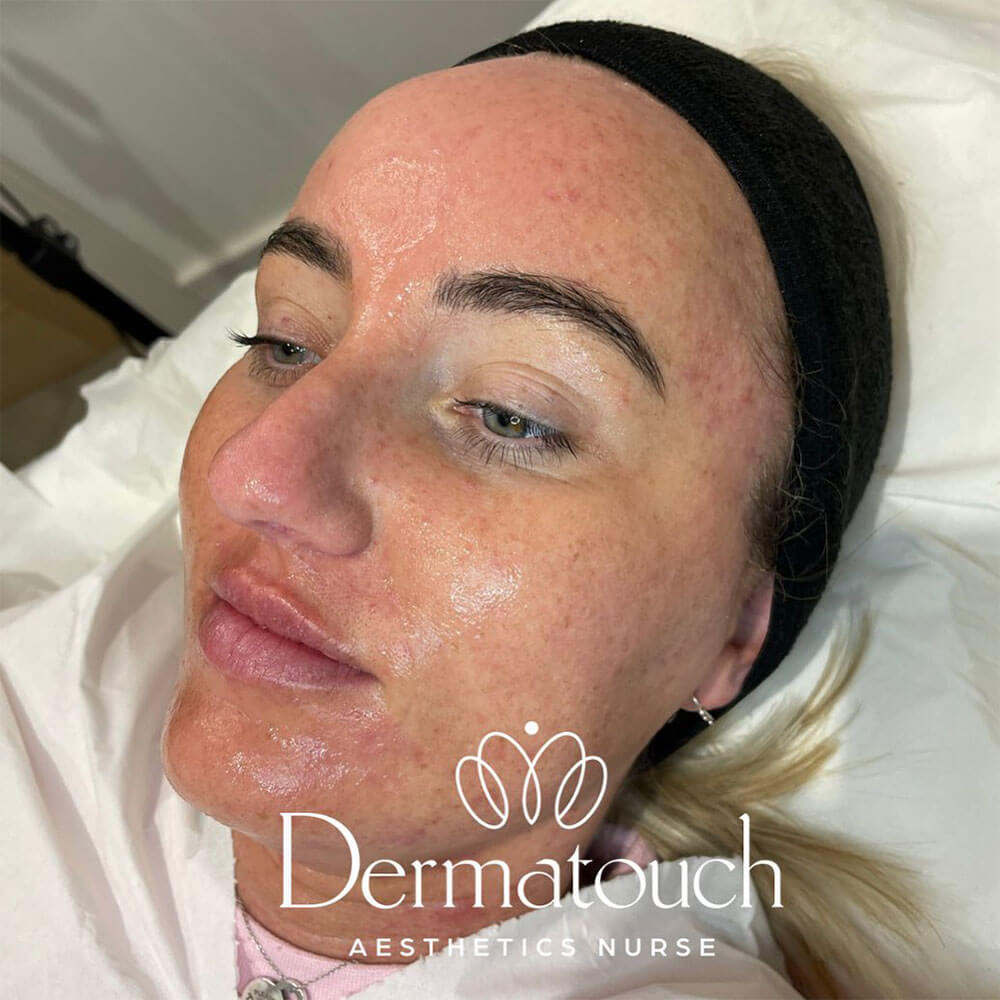
The skin looks red and irritated. There may be some white spots that indicate where the agent has penetrated particularly deep and where extreme peeling can be expected (this effect is called frosting or crystallization).
However, we should mention that some peeling systems exclude neutralization. If that’s the case, you’ll leave the clinic with the solution still on your face and be instructed on when and how to wash it off at home.
Step 5 – Aftercare
The treatment may be over, but the process is not. Keeping up with proper aftercare is crucial to the success of chemical peels. Clients need to stick to the prescribed routine as closely as possible to ensure the skin recovers without complications.
The aftercare routine depends on the type of peel performed, but one thing they all have in common is the strong warning not to pick or pull at the peeling skin, no matter how tempting it may be. The skin needs to flake off on its own.
Only once all the flakes have fallen off can the process be considered finished. This should be around day 7 for light peels, but may take longer for deeper ones.
Step 6 – Optional Repetition
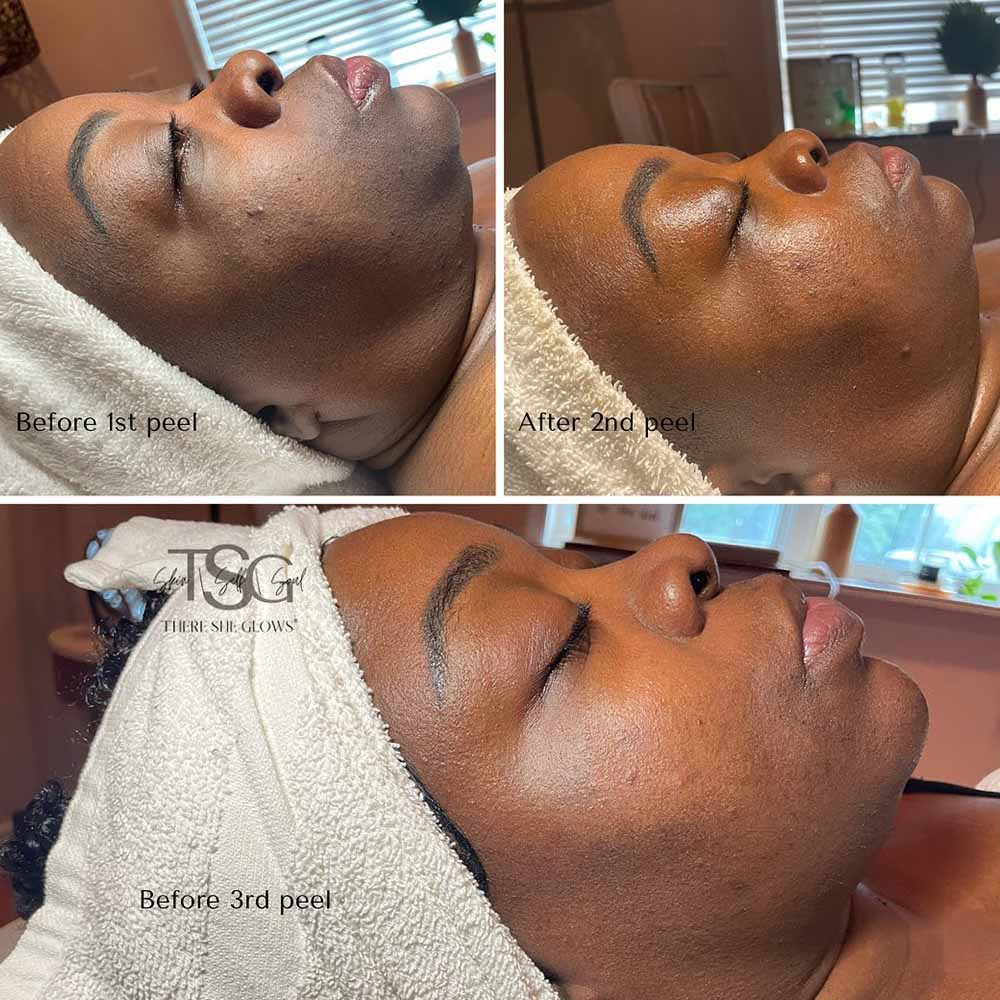
Some types of chemical peels are done as one-off procedures, others are done as a series. This depends on the type of peel and the desired effects.
If you’re doing a series, you will have to wait a designated amount of time between sessions, to allow the skin to heal completely before it’s compromised again.
What to Expect After a Chemical Peel
A chemical peel will cause a layer of your skin to peel off in patches and flakes, and this will last for 7-14 days depending on the intensity of the peel. There will be some additional side-effects like redness, burning, swelling, itchiness, tightness and dryness.
It’s an urban myth that a chemical peel will leave your face bloody and raw – this is a wild exaggeration.
Let’s look into the chemical peel process:
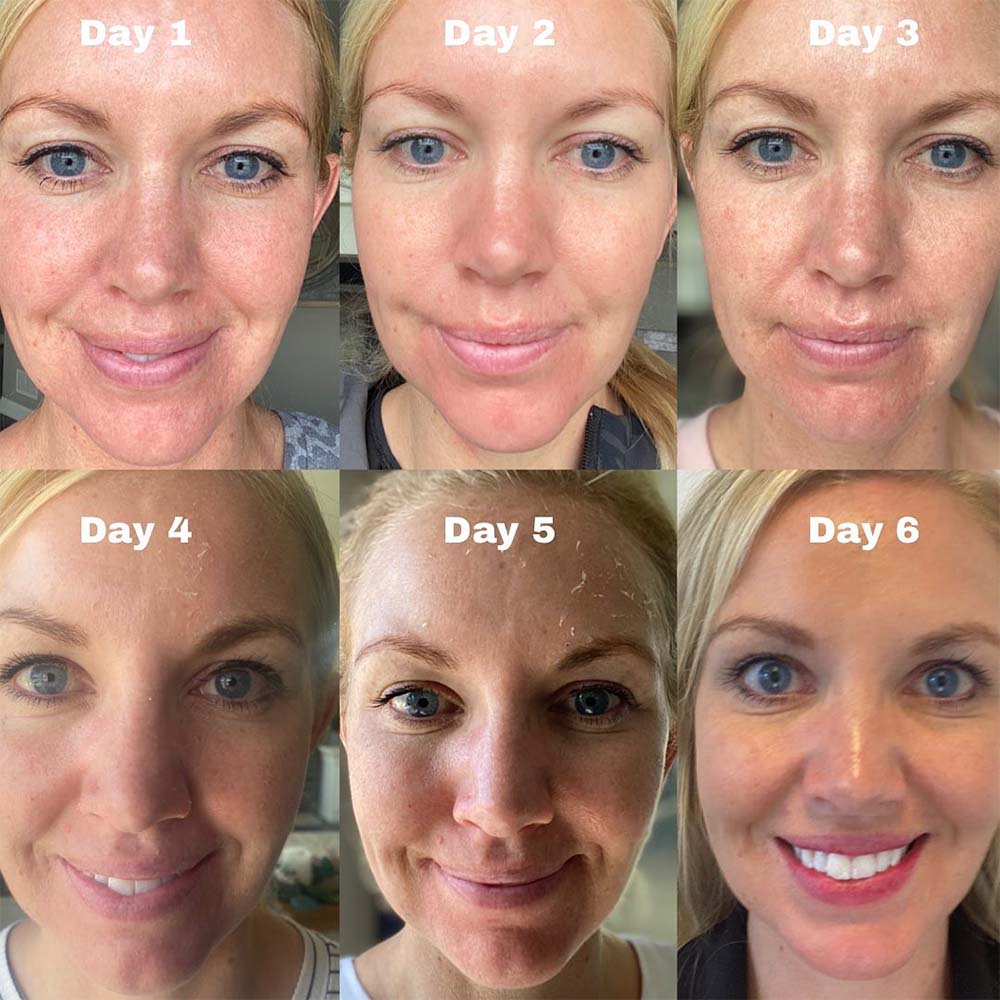
Chemical Peel Process Day by Day
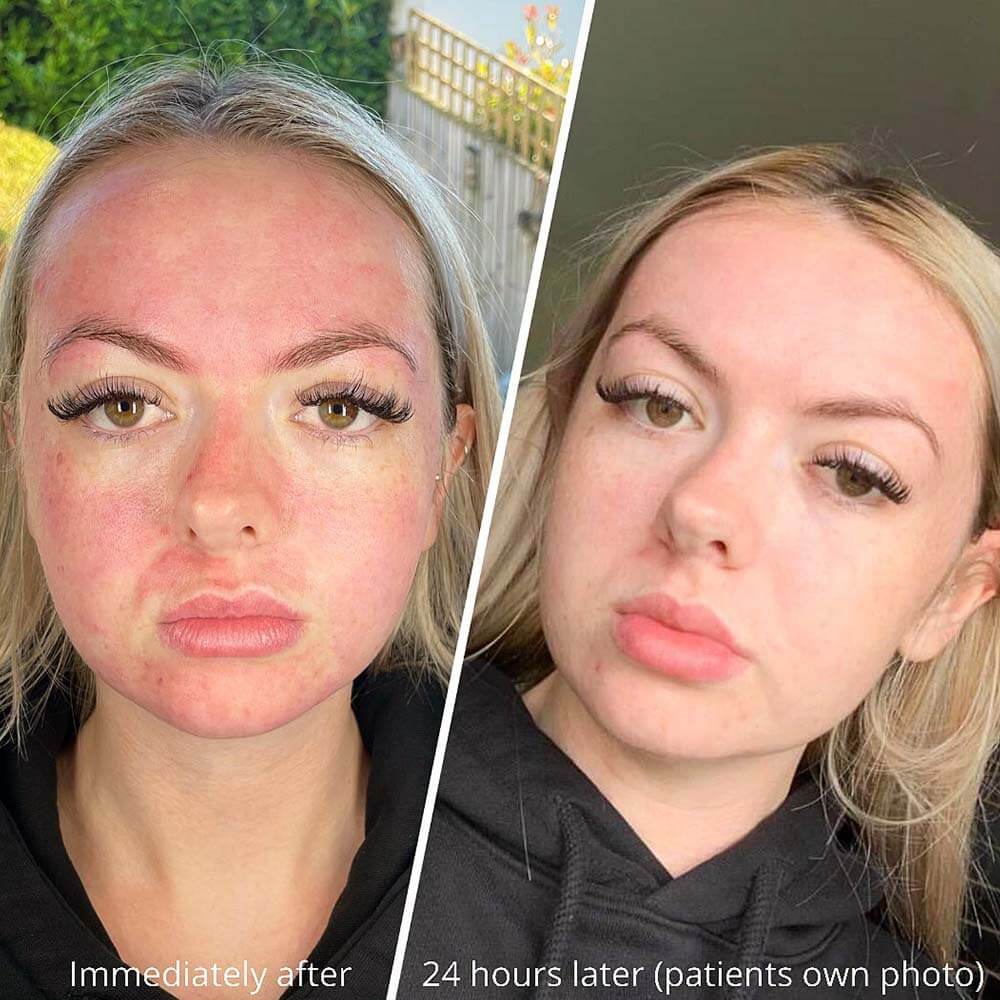
Day of the Treatment
Your skin will be red and irritated immediately after the treatment. It will feel tight and dry. If the peel was more intense, you can expect some burning, swelling, and a throbbing sensation. Many clients describe these sensations as the discomfort of a sunburn.
A mild painkiller may minimize the discomfort.
In the case of deep peels, your doctor may put a protective dressing over the area.
Day 2
Your skin will calm down a bit. It will still feel dry and tight, and there might be some itching. Using your moisturizer will provide relief.
As your skin will probably still be red, you may be able to wear makeup to cover it up – check with your dermatologist, it depends on what type of peel was done.
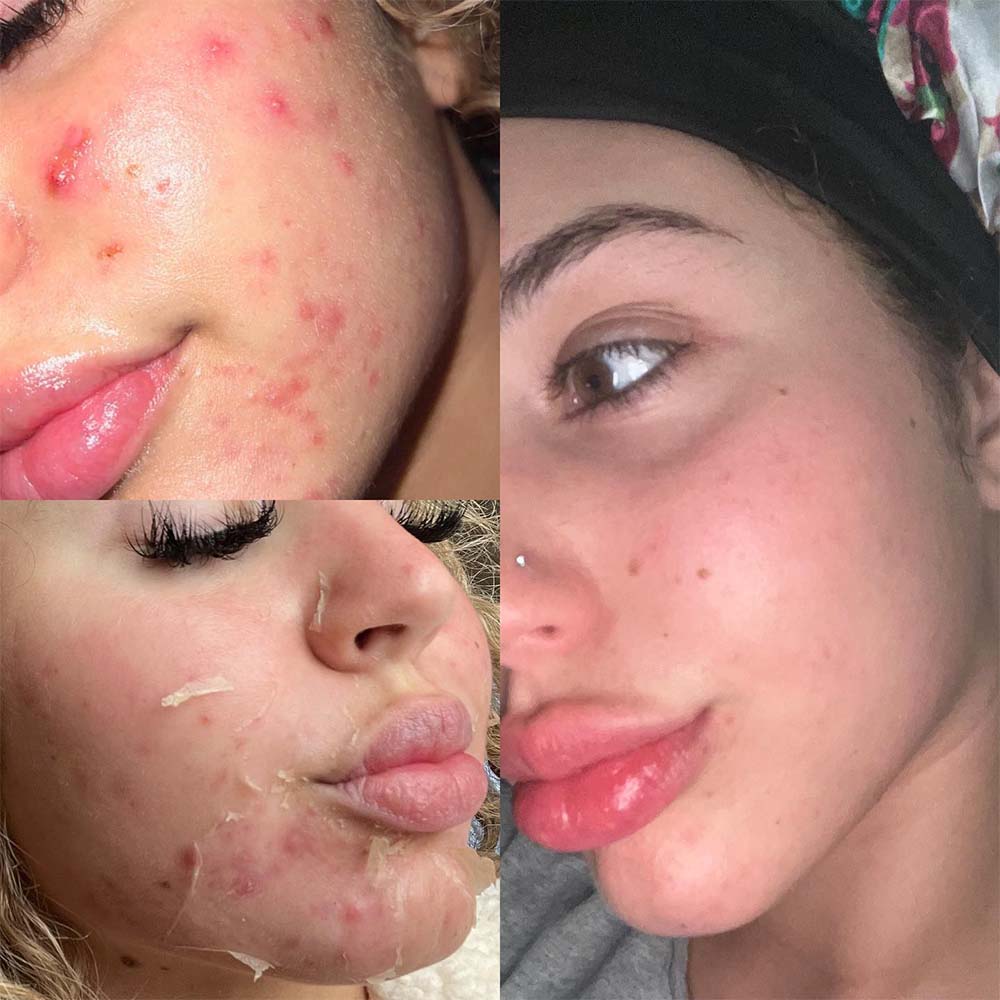
Days 3-5
The notorious peeling starts. Your skin will start peeling.
If the area treated is your face, you can expect the peeling to start around your mouth first, as this is the part that moves the most. It will spread outwards, finally reaching under your jawline and up into your hairline.
There might even be some peeling on your earlobes! Obviously, these areas weren’t directly exposed to the peeling agent, but the agent spreads as it’s absorbed, so you can expect some collateral peeling, if we can put it like that.
The peeling will probably be at its worst around day 4. By day 6, it should be down to light flaking in certain spots.
Days 5-14
If your peel was on the lighter side, you’re probably done! Enjoy the results and remember to wear your SPF.
But if it was more intense, your skin might still be peeling, or you may notice other signs of healing, like minor scabbing. Wait it out, continue not touching the flakes, and wear your SPF.
You can find an even more detailed description of the chemical peel healing process here, along with more pictures.
NOTE
Some clients may notice a pimple or two emerging in the days after the treatment. This is nothing unexpected – the pores are cleansing themselves out.
Chemical Peel Aftercare
Aftercare is an extremely important part of the chemical peel process, and it includes proper cleaning, moisturization, wearing SPF, and letting the skin peel off on its own.
The treatment leaves the skin irritated and hyper-sensitive to sun radiation, dehydrated and obviously peeling.
The aftercare routine, therefore, entails a strict cleaning and moisturizing regime, using approved products exclusively. Moisturization is extremely important, as the protective layer is removed and water evaporated from the skin very quickly. A moisturizer traps the moisture.
It also implies preventing exposure of the treated area to sunlight, heat, and sweat.
Wearing SPF consistently is absolutely necessary in the weeks following a chemical peel, regardless of intensity. The skin is stripped of its protective layer, so it’s extremely sensitive to sun radiation. It’s best not to expose the skin to sunlight at all in the first 7-14 days, but if you absolutely must, wear a high SPF and protective clothes.
The other absolutely necessary point is letting the skin peel off on its own, without even the lightest pulling or rubbing. Forcefully removing the flakes can lead to scarring and discoloration, as the healing process is disturbed. You can, however, use sterile scissors to cut off some of the particularly annoying larger pieces – just don’t pull.
When cleaning the area and moisturizing it, do so in dabbing motions.
This is a general outline of the chemical peel aftercare process – the dermatologist will prescribe one perfectly suited to the type and intensity of the peel.
You can find more in-depth information on chemical peel post-care here.
Chemical Peel Risks
Chemical peels are relatively low-risk, but there can be complications if the treatment is performed by an inexperienced technician. Certain risks exist, and they include scarring, discoloration, infection, and damage to internal organs.
Let’s explain the risks associated with the procedure:
- Scarring. If the peel was too intense for your skin, or in the case of ripping off patches during the peeling stage, the skin may not be able to recover properly and scarring could emerge. To prevent this, only get chemical peels from board-certified dermatologists.
- Discoloration. More common in darker skin tones, a chemical peel may cause hypo- or hyperpigmentation. These color changes may be temporary or, in rare cases, permanent.
- Infection. After a chemical peel, the skin is very sensitive to external influences, and it’s therefore prone to bacterial, viral or fungal infections. These are prevented by keeping up with the aftercare routine and not touching your face any more than necessary.
- Cold sore flare-up. If you’re prone to cold sores, a chemical peel can cause a flare-up. Your dermatologist can prescribe an antiviral med to prevent this.
- In the case of a deep peel, internal organ damage. Phenol or carbolic acid used for deep chemical peels can potentially cause damage to the heart, liver or kidneys as they’re absorbed. This only happens in the case of over-exposure, so, again, only get chemical peels from board-certified dermatologists.
When performed right, by an experienced dermatologist, and accompanied by the proper upkeep of the aftercare routine, your chemical peel should go without any complications and leave your skin healthy and glowing.
How Much Does a Chemical Peel Cost?
According to the American Society of Plastic Surgeons, the average cost of a chemical peel is $519. However, this is an average price that encompasses all 3 types of peels – light, medium depth, and deep peels.
Light to medium depth peels are usually in the $100-$400 range per treatment. Deep peels can cost as much as $3000, especially those that require anesthesia and sedation.
The average cost of a chemical peel is a tricky thing to pinpoint, since the price is formed based on many factors:
- Type of peel
- Size of the treated area
- Location
- Expertise of the doctor
- Exclusivity of the clinic
- Number of sessions.
We advise you to consult dermatologists in your area and have them give you an estimate on the price of a chemical peel in your particular case.
If you want to learn more about the price range, check out our Chemical Peel Cost Guide.
Chemical Peel – Main Takeaways
Chemical peels are skin resurfacing treatments which cause intentional, controlled trauma to the skin by using various acids.
The treated skin goes through a cycle of peeling and subsequent recovery, minimizing or eliminating a wide range of conditions (signs of aging, discoloration, acne, acne scars, etc.), or just improving the overall appearance and texture of the skin. Depending on the severity of the conditions, the peel can be light, medium depth, or deep.
It’s a very effective treatment that can be done as a one-off or as a series of treatments. However, it’s not for everyone. Clients should be prepared for an intense aftercare period and disciplined enough to keep up with the prescribed routine to ensure proper recovery.
Final warning – only get chemical peels from board-certified dermatologists!
weekly insight into PMU insdustry
Subscribe to our FREE newsletter. 100% good stuff.

support us so we can keep providing you with free education , information and inspiration.